Showing posts with label Hero Arts. Show all posts

Monday, August 27, 2018

Flower Box


This card is straightforward, but here's a quick rundown of the layers. The flower box die cut is white, with a polka dot background behind it, mounted on a solid teal square. The same polka dot paper (sorry, I don't remember the source) is layered on top of a white note card, with a square cut out -- inside which the flower box layers were centered. The sentiment banner was folded so that it stands up from the card for a little added depth. It might sound more complicated than it was!

Enjoy your week!

Supplies:
Stamps - sentiment from Hero Arts "Everyday Sayings"
Ink - Memento "Teal Zeal"
Dies - Pinkfresh Studio "Floral Squares"; Spellbinders square

Monday, August 20, 2018

Split Personality

I have two cards to share today that use the same basic layout.


This first one features a two-part butterfly (or moth?) die, which I like because you can use the solid die alone, or the detailed one, or you can combine the two as I did here. {Time out: I just Googled it, and one physical difference between a butterfly and moth deals with the antennae. A moth has feathery or comb-like antennae, and a butterfly's antennae are thin with club-like tips. So there you have it. Although it's hard to see, on the print there are tiny club-like tips, so those are butterflies. But I don't see any clubs on the die cut, so that one must be a moth. Which means despite the similar shape of the wings, I've apparently mismatched my insects, and now I feel stupid. So let's move on quickly...}

And my second card:


The "Forget Me Nots" seed pack image on this card was a rectangle I cut out of the designer paper. One sheet in the pad had different colored, coordinating seed pack images including this one, plus one for daffodils, pansies, lilies, daisies and peonies. These images along with the coordinating colors and patterns of paper made for some easy-to-design cards. I wanted to make an "I Miss You" card, and thought the sentiment paired well with these flowers, because both connote distance to me.

I'm subbing in a 1st and 2nd grade classroom today, so maybe I can teach the students about butterflies and moths, and they'll grow up smarter than I did. 

Have a great week!

Supplies - Card 1
Stamps - Hampton Art "Hope & Faith"
Paper - "Garden Party" by Pebbles
Ink - Versafine onyx black
Dies - unbranded butterfly

Supplies - Card 2
Stamps - from Hero Arts "Everyday Sayings"
Paper - "Garden Party" by Pebbles
Ink - Versafine onyx black

Friday, August 17, 2018

Butterfly Doily


This designer paper is different in that it seems to change color depending on what colors it's around. When I saw it in the pad, it looked like a grayish hue. My husband saw it and thought it had some green in it. But I liked the look of it paired with this chocolate brown paper, which makes the print sort of a mocha color. I thought the little doily resembled the flowers, so that's how the card came together. The butterfly just happened to be something small enough to fit on the doily. I wish you could see the shimmer on the butterfly's wings though -- that's my favorite part of the card.

Have a great weekend!

Supplies:
Stamps - sentiment by Hero Arts "Everyday Sayings"; Butterfly from Penny Black "Enamor" clear set
Paper - from Love Nicole "Delicate Floret" 6x6 pad
Ink - Versamark for sentiment; Ranger Adirondack "Espresso"
Dies - unbranded doily
Accessories - White embossing powder

Wednesday, August 15, 2018

Dragonfly Prayers


Here's another card where the pretty paper does all the work. All I had to do was add a nice sentiment, in this case, something from Hero Arts "Prayers" Stamp & Cut set. The word "prayers" is die cut, but the rest of the sentiment is stamped.

The hardest part of all of this was the dragonfly's wings; I usually use vellum when I make a dragonfly's wings, but the vellum just kind of disappeared on top of the paper design. White paper stood out as too bold. I finally settled on adding glitter spray to the white wings, which toned them down a bit and added a nice shimmer as well.

I've entered this card into Splitcoast's Clean & Simple challenge for the week - to make something with wings. There are some great entries there if you want to take a peek.

Enjoy your Wednesday!

Supplies:
Stamps - Hero Arts "Prayers" Stamp & Cut set
Paper - From Love Nicole "Aquarelle" pad
Ink - Memento "Sweet Plum"
Dies - Hero Arts "Prayers"; Memory Box "Dazzling Dragonfly"
Accessories - Tattered Angels "Iridescent Gold" Glimmer Mist

Friday, July 20, 2018

Abstract Hello


I'm having fun playing with my new "Floral Squares" dies from Pinkfresh Studio. One thing I like is that you can use the negative (cut out) portion of the die as well as the regular framed flower die, so with each cut, you have two die cuts you can create with. Here, I've used the negative portion, so the flower has been punched out of the purple paper.

The designer paper is from the "Aquarelle" pad by Love Nicole. Yes, I know I've used these papers a lot -- just a testament to how much I like them! This print is kind of wild, so I used a strip of vellum underneath the "hello" die (Hero Arts) so that it stands out a bit more.

It's the weekend! Hope you all have a great one!

Wednesday, July 11, 2018

Sailboat Peace


I played along with the Splitcoast "Clean and Simple" challenge #489, which was to make a "tropical" CAS card. If I went on a tropical vacation, I'd hope it would be like this "Beachfront Boat" stamp scene by Stampendous. Whether on that boat or on that beach, it looks so quiet and peaceful, I could think of no better sentiment! And because I will be using this in my card ministry, I paired the idea of peace with the inside scripture "Be still and know that I am God. - Psalm 46:10"

I'm also submitting this to the Dragonfly Journeys "Summer Lovin'" challenge. I'm sure everyone has some kind of summer stamps or dies, so link it up so we can see what YOU made! :)

Supplies:

Stamps - "Beachfront Boat" by Stampendous; "Holiday Word Borders" set by Hero Arts
Paper - "Aquarelle" (6 x 6 pad) by Love Nicole

Ink - Versafine onyx black; Ranger Distress Oxide inks for watercoloring
 

Friday, July 6, 2018

Collage Duo

REMINDER: Now thru July 8, enjoy 40% off ALL Hambo stamps! See our SALE page for details. 


I had this "collage" page in my Pebbles paper pad that I wasn't sure how to use. It's kind of busy to use as a background, as I normally do my designer papers. But then instead of seeing the page as a whole, I started seeing the smaller squares and rectangles and ways I could divide the paper, and I came up with two designs:


Not only did dividing up the squares make them more manageable, but I still have enough squares left over that I could make a third card -- just not today!

The first card uses two rectangular sections that I cut out:


I framed these two sections with another coordinating paper from the same pad. For some added interest, I used a couple of dies to cut out a red heart, which I popped up on the bottom, and a yellow flower, with a little jewel center.

For my second card, I centered a larger portion of the collage on my white card stock base:


I framed it out with a coordinating turquoise solid paper, and then added a Hero Arts sentiment to the bottom. Very CAS (clean and simple)!

This keeps happening to me, where a design that I originally skipped over because I didn't know how to use it, ends up making cute cards that I want to duplicate! Maybe some day the lesson will sink in, and I won't immediately dismiss something that is challenging.

Have a great weekend!

Supplies:

Stamps - sentiments on both cards by Hero Arts "Everyday Sayings"
Paper - "Garden Party" by Pebbles

Ink - Memento "Lady Bug" red (top); Memento "Teal Zeal" (bottom)

Dies - heart & banner (top) by Becky Higgins

Wednesday, July 4, 2018

Stenciled Leaf

REMINDER: Now thru July 8, enjoy 40% off ALL Hambo stamps! See our SALE page for details. 

Now on to today's card:


I'm very happy with how this stencil (Carabelle Studio) worked! I didn't have to adhere it in any way; I just held it down with the tip of one finger, and sponged the Tim Holtz distress oxide inks around it. It stayed in place without slipping, and I got this really crisp image.

I layered this on a print from Love Nicole's "Aquarelle" pad for a cool monochrome look. The finishing touch was the Hero Arts sentiment, which was embossed in white.

Happy 4th of July!

Monday, July 2, 2018

Making Some Noise

REMINDER: Now thru July 8, enjoy 40% off ALL Hambo stamps! See our SALE page for details. 

Now on to today's card:


While on a stamp retreat years ago with some of my Hambo Stamps designers, I was privileged to receive a tutorial from card-maker extraordinaire Melissa Edwards. She is a master of coloring, but the technique she showed us was using markers on an acrylic block and spritzing to do easy water-colored backgrounds. I've since made dozens of cards (you can see some here and here) using her technique, because not only is it very easy to do, but the results are STUNNING. But we didn't merely lay down the watercolor -- she taught us to add "noise" to the color, which kicks it up a notch.

My card above demonstrates such "noise." Although this time I used a swatch of designer paper instead of using markers to make the water-colored strip, I still started with basic variations on a color:


Above is the paper I chose from Love Nicole's "Aquarelle" pad. I cut it down so that I just had purplish strip on the left. I could have left the strip as it was, glued my die cut on top and finished the card, but it would have looked a little more dull than it does with the added "noise." I started with a script background stamp, and stamped it in an ink that coordinated with the paper's design, but wasn't too dark. You want the noise to be there, but not stand out too much on its own. Next, I chose another coordinating color to stamp some leaves randomly over the script. The paper already had some white spots included in the design, so I was satisfied to stop there. You can see a close-up of the noise below:


With the paper now jazzed up, I was ready to glue it to my white card base, and add the "Prim Poppy" die cut. Finally, I finished the card with a scripture stamp from Verve. The noise adds just enough extra drama to help the die cut stand out a little more, and leads to a more interesting card.

Do you like to add noise? If you've never tried it, give it a shot, and feel free to link up your result in the comments below.

Happy stamping!

Supplies:

Stamps - scripture from "Scripture Medley 4" by Verve; script background by Recollections; leaves from "Fanciful Filaments" set by Hero Arts
Paper - "Aquarelle" (6 x 6 pad) by Love Nicole

Ink - Memento "Lilac Posies" for sentiment and leaves; "Sweet Plum" for script background

Dies - "Prim Poppy" by Memory Box 

Friday, June 29, 2018

Pretty Poppies


It's been forever since I played along with a Splitcoast sketch challenge, so I'm patting myself on the back a little, because I found this one to be kind of tough. I had several images that could take up the longish space on the left, but what would coordinate for the smaller boxes on the right?

I really wanted to use my Stampendous "Poppy Scene" stamp on the left, but adding further to my problem was that the frame around the image was irregular. My solution? Doodling!


That's right - those boxes on the right were doodled with a Micron pen. I stamped poppies from a Technique Tuesday clear set, but they didn't look right. I settled on keeping the stems from that stamp, but then re-stamping the Stampendous one, and cutting out some of the poppies to glue on top of the Techique Tuesday stems. Then I used a sentiment from Hero Arts to complete the layout.

I always like a red/white/black combination (maybe because of my love for the Detroit Red Wings?), and I think this pops. Hah! Appropriate for "Pop"pies! LOL (I crack myself up.)

Enjoy the last few days of June. See you in July! OH - And look for a big Hambo Stamps sale coming up next week! 40% discounts on everything - spread the word!

Have a great weekend!

Supplies:

Stamps - Stampendous "Poppy Scene"; Technique Tuesday "Growing Wild" set (stems); Hero Arts "Everyday Sayings"
Paper - "Garden Party" by Pebbles (DP); Stampin' Up real red cardstock

Ink - colored with Copic markers; sentiment embossed with white powder

Dies - banner from Becky Higgins set

Wednesday, June 27, 2018

Bird of the Feathers


This card is a simple one. I love this fun feather print (from Love Nicole's "Delicate Floret" pad), but I didn't have any feather stamps or dies to use with it. But I DO have this bird die, which I paper pieced to match the feathers a bit. I quite like how it turned out! Unless you stop to think why the feathers are flying around, and then it seems, well... tragic. LOL Guess this poor birdie is going to need a new mate??

Happy Wednesday!

Monday, June 25, 2018

Sunflowers


I mentioned last week that I found some great deals at Tuesday Morning; this Stampendous "Sunflower & Ladybug" stamp was one of them. The large cling stamp was $2.99, I believe. I love deals like that!
The image was water-colored with distress oxide inks, and then cropped with a Spellbinders oval die. The Hero Arts sentiment finishes it off.

Have a great week!

Friday, June 22, 2018

Rusty Rose


If you're like me, when you flip through a designer paper pad, there's usually one or two patterns that you kind of say "Aaack! What in the world will I do with THAT??" This was one of those patterns for me. While I really love almost all of the prints in Love Nicole's "Aquarelle" pad, this one was quickly skipped past. And, as has happened before, what I originally didn't like ends up being a favorite. Go figure.

The thing that originally stumped me was the color combo, I think. Powder blue, mixed with rust, mixed with purples? Oh, and some olive green for good measure. I was trying the print out with different solids, and when I hit upon this SU rust color, I liked it! Suddenly, it seemed like the color combo made sense. I added this flower from the Penny Black "Enamor" set, which I colored with Copics. This is probably the first time I've used my Copic markers in at least a couple of years, but I'm happy to say they were still mostly juicy.

I added the Hero Arts sentiment, stamped on a banner die from a Becky Higgins (American Crafts) die set found at Tuesday Morning. There are 8 really useful dies in the package, for $4.99. Score!

Since I still have time, I will enter this into Jeannie's "Rose Garden" challenge that ends this weekend. There's time for you to play along too!

Have a great weekend!

Monday, June 18, 2018

In Distress


I'm unable to read or hear the scripture on today's card, without automatically starting to sing the song in my head that we sang in rounds at summer camp. Does anyone else know the song? It is simply the words of Philippians 4:4 repeated over and over. Still, it's quite catchy, and an easy way to learn and remember the verse. This is one of the stamps in Verve's "Scripture Medley 1" set.

Craft cardstock serves as the base of this card, which I thought coordinated well with the distressed patterned paper from an old Making Memories "Travel" pad. I added a couple of cardboard buttons tied with cord.

While on the subject of distressed, I'll go ahead and share a bonus card I made in the same sitting:


This card makes me laugh, because in one photo I took of it, you would think you'd have to wash your hands after handling it -- it was very dingy looking. Thankfully the other photos came out better. This one also uses a patterned paper called "post mark" from the same "Travel" pad as the paper above, along with a craft cardstock base. The "thanks" is a stamp by Hero Arts.

I think the "thanks" card is appropriate, since you'll certainly want to thank me for the earbug, if you played the song on Youtube that I linked above. You're welcome! ;)

Friday, June 1, 2018

More Color!


My friend Jeannie runs "Dragonfly Journeys," a challenge blog, and her challenge this week is called "Somewhere Over the Rainbow." It sent me looking for rainbow paper so that I could play along.  I found a perfect sheet in an American Crafts 6x6 pad called "#Summer" that allowed me to make two cards. This first one uses a strip of the striped paper, along with a sticker I found in my stash, which I popped up on dimensionals.

My second card uses the same paper:


This time, I added a tag with a die cut "hello" (Hero Arts), and stamped a sentiment below from Hero Arts' "Everyday Sayings" clear set. This is perhaps my most used set in my card ministry, because it contains nearly every saying I need, including "thinking of you" in 3 different fonts. Inside this card, I added a verse from Hampton Art's "Hope & Faith" set:


I AM truly glad, because today is the first day of June, and summer break is just around the corner. "Wonderful Joy" indeed! Wishing you joy as well!

Thursday, May 10, 2018

Hello, and Welcome!

(Click for a larger photo)

Hello! It has been YEARS since I've had a blog, perhaps because I eventually ran out of things to say. Well, that's not really true, but things certainly changed in my life when I decided to put my stamp business, Hambo Stamps, on the back burner and focus more on my family. My stamp biz was taking over the house, right at a time when my kids were entering their teenage years, and needing more space. So while I didn't close my business completely, I DID quit promoting it, and spent my energy instead on my kids, a partial house renovation, and eventually -- as I began to itch to stamp again after taking so much time off -- the creation of a card ministry for my church.

I've been leading out in this card ministry for a few years now, and as my profile on the right says, I learned some things in the process. My hope is that the things I have learned will benefit others who might be doing a card ministry themselves, or wanting to start one. No sense re-inventing the wheel, right? Let my experience help you sidestep the potholes that I fell in, and one-up my successes.

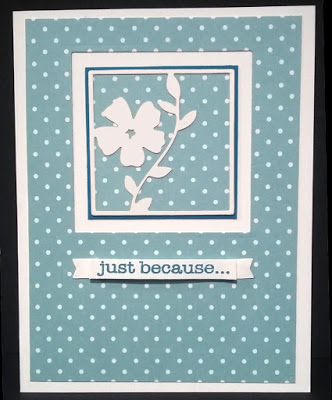
I will share some cards with you along the way so you'll have something to look at instead of/in addition to reading my ramblings. You'll note that my card style is CAS (clean and simple) for the most part, which actually works quite well for card ministry, because you'll want those cards to fit in an envelope and be sent at regular postage rates!

Today's card has layers though, and was made with a GORGEOUS designer paper that was included in the spring edition (Apr/May/Jun 2018) Stampers' Sampler magazine. It is called "Budding Thoughts" by Eirene Nguyen. This was the background paper for my card. I had a piece of scrap paper with what looks to me like dogwood blooms, which I coordinated with the background. The papers were so pretty, I didn't want to cover them up, so I used a vellum tag with a Hero Arts "Hello" die and a rose gold brad. The brad will cause a small bump in the envelope, but it shouldn't cause any mailing problems.

I hope you'll check back in from time to time, and be sure to let me know if you have any specific questions about card ministries that I might be able to answer by email or in a later post. I'm not claiming to be an EXPERT, but hopefully the experience that I DO have will help!